


🚿 Upgrade Your Sink Game!
Buy Bathroom Sink Drain,Drain Stopper Bathroom Sink Without Overflow,Pop Up Drain Strainer,Stainless Steel Chrome: Sink Drains - desertcart.com ✓ FREE DELIVERY possible on eligible purchases Review: Great drain! Just needs proper installation like any other - This drain is great. I'm seeing a number reviews that mention leaks, but by in my experience this is 100% installation technique. The technique I use to seal the drain with putty or dope is below. Every drain, not just this one, is likely to leak from the threads without strategic use of putty or dope, because as one reviewer mentioned, a rubber ring can not fill and seal the valleys of threads. Another mentioned using putty and dope above and below the seal, which of course didn't work, so they demanded the tailpiece be made so the threads stop where the seal is positioned - which is impossible because every sink is different in thickness so the seal will land in a different position with every sink. So, here's what you do: First, I recommend losing the top seal that goes between the drain flange and the sink. This isn't a leakage thing - they work ok to seal out water - but they usually make the drain sit up a bit in the sink creating a "ledge" the last bit of water can't get over. You'll replace that seal with putty later. Next, drop the drain into the sink, with no putty or anything. Grab a sharpie, go under the sink, and mark the the threads right where they emerge from the sink, and again about 1/4" down from there. THIS IS WHERE THE SEAL WILL LAND WHEN YOU INSTALL THE DRAIN! Now take the drain out, and use plumber's putty or dope - personally I prefer putty - to FILL THE VALLEYS OF THE THREADS BETWEEN THOSE MARKS. So you're filling up the threads where the rubber seal will eventually land! Make sense? Finally, press a rope of putty to the bottom of the drain flange (some folks use ilicone here - again it's a personal preference thing) and drop it back into the sink, press it down so your now-sealed threads are showing under the sink, and put the rubber seal and washer on. I usually dope the threads just under the rubber seal so the threads of the nut are sealed too. Some people use putty for this but i prefer dope. Thread the nut on, tighten it up, clean the excess putty around the drain flange in the sink, and you should be 100% leak-free! If installed properly this is a great drain, nice finish, good positive seal but not too hard to push to open or close. Highly recommended. Review: Purchased two. One leaked. All's well that ends well. - I purchased two of these pop up drain assemblies to use with identical Hansgrohe faucets in what should have been identical sinks. One installation was easy and flawless. I used the supplied fittings and washers with complete success. The other leaked. It seems there is sufficient variability in porcelain casting and firing that the drain assembly didn't seat properly with the supplied washer. I replaced the top washer with old-fashioned plumber's putty, added teflon tape to the threads and reassembled. When all was well tightened, the installation passed all tests. No leaks and me, a happy camper.


| ASIN | B0781YQZR7 |
| Batteries Included? | No |
| Batteries Required? | No |
| Best Sellers Rank | #70,722 in Tools & Home Improvement ( See Top 100 in Tools & Home Improvement ) #134 in Bathroom Sink Drains |
| Color | Chrome |
| Customer Reviews | 4.4 4.4 out of 5 stars (1,524) |
| Date First Available | February 2, 2018 |
| Flow Rate | 1.19 Gallons Per Minute |
| Is Discontinued By Manufacturer | No |
| Item Weight | 10.9 ounces |
| Item model number | WH-1601K |
| Manufacturer | ALLWIN-HOUSEWARE W |
| Material | Brass |
| Number Of Pieces | 1 |
| Package Dimensions | 8.26 x 2.8 x 2.7 inches |
| Part Number | WH-1601K |
| Size | Small Popup Cap |
S**.
Great drain! Just needs proper installation like any other
This drain is great. I'm seeing a number reviews that mention leaks, but by in my experience this is 100% installation technique. The technique I use to seal the drain with putty or dope is below. Every drain, not just this one, is likely to leak from the threads without strategic use of putty or dope, because as one reviewer mentioned, a rubber ring can not fill and seal the valleys of threads. Another mentioned using putty and dope above and below the seal, which of course didn't work, so they demanded the tailpiece be made so the threads stop where the seal is positioned - which is impossible because every sink is different in thickness so the seal will land in a different position with every sink. So, here's what you do: First, I recommend losing the top seal that goes between the drain flange and the sink. This isn't a leakage thing - they work ok to seal out water - but they usually make the drain sit up a bit in the sink creating a "ledge" the last bit of water can't get over. You'll replace that seal with putty later. Next, drop the drain into the sink, with no putty or anything. Grab a sharpie, go under the sink, and mark the the threads right where they emerge from the sink, and again about 1/4" down from there. THIS IS WHERE THE SEAL WILL LAND WHEN YOU INSTALL THE DRAIN! Now take the drain out, and use plumber's putty or dope - personally I prefer putty - to FILL THE VALLEYS OF THE THREADS BETWEEN THOSE MARKS. So you're filling up the threads where the rubber seal will eventually land! Make sense? Finally, press a rope of putty to the bottom of the drain flange (some folks use ilicone here - again it's a personal preference thing) and drop it back into the sink, press it down so your now-sealed threads are showing under the sink, and put the rubber seal and washer on. I usually dope the threads just under the rubber seal so the threads of the nut are sealed too. Some people use putty for this but i prefer dope. Thread the nut on, tighten it up, clean the excess putty around the drain flange in the sink, and you should be 100% leak-free! If installed properly this is a great drain, nice finish, good positive seal but not too hard to push to open or close. Highly recommended.
J**E
Purchased two. One leaked. All's well that ends well.
I purchased two of these pop up drain assemblies to use with identical Hansgrohe faucets in what should have been identical sinks. One installation was easy and flawless. I used the supplied fittings and washers with complete success. The other leaked. It seems there is sufficient variability in porcelain casting and firing that the drain assembly didn't seat properly with the supplied washer. I replaced the top washer with old-fashioned plumber's putty, added teflon tape to the threads and reassembled. When all was well tightened, the installation passed all tests. No leaks and me, a happy camper.
K**R
Way better than anything bundled with a faucet
I replaced my old leaky bathroom faucet with a Delta faucet and although the faucet is great the drain that came with it was pretty cheap- all plastic. This was a huge upgrade from that one, made from metal and a lot heavier. These drains do get a lot of wear and tear and the last thing you want is a hole worn in your drain pipe so spending a few extra bucks now can save you a lot of hassle in the future. I really like the pop-up drain- it holds water very well and was pretty simple to install (and I'm not much of a plumber). It also looks great and feels really solid when you open and close it. The rubber gasket that came with it leaked a tiny bit at first so I just took it out and used plumbers putty instead and it worked flawlessly. If you're installing it yourself pick up a tube of Rectorseal and you'll be in good shape.
I**A
Great product, inadequate instructions.
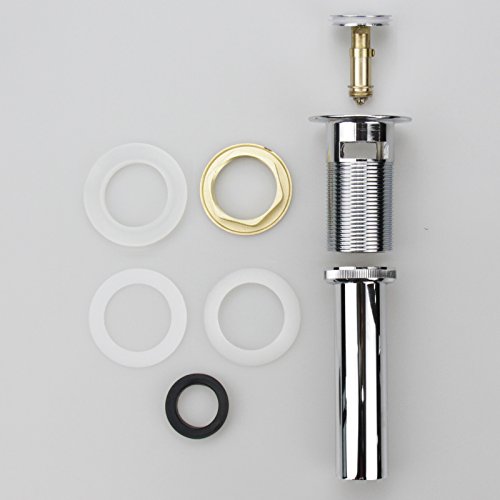
I am quite satisfied with the way this project finally turned out, but I had to do it over three time to get it right. The instructions say "Supply enough tape or sealant to (8) thread." (8) is a smooth tailpiece with no threads at all. The tape must go on the threads of the drain body (2). When I first made up the fitting, withjout sealant under the brass locknut, there was a bad leak. I disassembled the drain and added a lot of teflon tape and TFE paste under the brass locknut. sits. When I tightened the nut the leak was gone - but the paste made a mess. But the bigger problemt was that the drain was not flush to the bottom of the sink, but raisedby the the thickness of the rubber gasket (3). Water pooled at the bottom of the sink, and it looked terrible. Once again I disassembled the drain. I cleaned up all the TFE paste, and neatly applied teflon tape to the right spot under the brass locknut. Then I discarded the rubber gasket (3) and replaced it with a bead of plumbers putty. This is the conventional way to install sink drains, and it worked fine The drain sits flush to the sink, and the drain body below is watertight and neat. On last thing. I love the way the bottom is made in two pieces (body and tailpiece) . This made it much easier to install the the old one piece drain it replaced.
J**L
No leaks if installed correctly.
It's important to read the directions and follow the advice of other reviewers. Plumbing putty is the key to no leaks. This is the second installation and the first went well using plumbers putty around the flange and threads where it tightens up under the sink. Lose the top plastic flange included. It's not needed and will only trap water in the sink. The directions mention this as well. Do not over tighten the nut on the bottom. It needs to be snug a barely more turns. When the whole thing starts turning you have tightened more than enough. Any more is just displacing the putty to where it is not effective. Draind well and looks good. Time will tell if the finish lasts.
L**N
What a time saver!
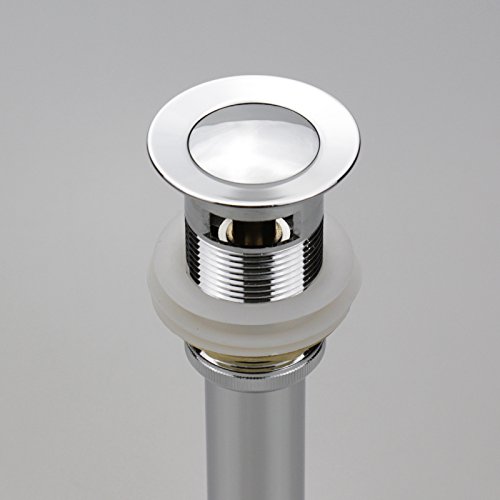
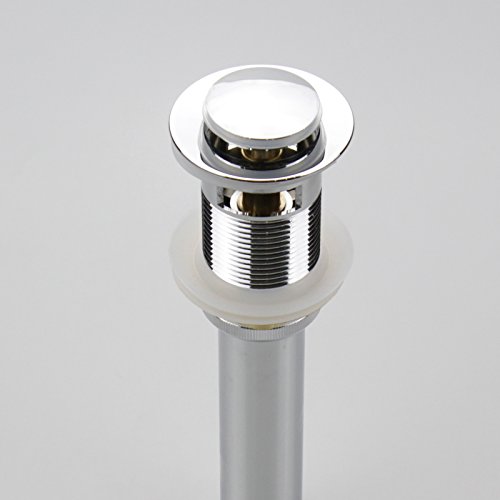
I wished I had found these years ago. I can't tell you how much time these save. Having to pull apart the old plunger types and remove all the gook and such, what a pain! These are so cool. They never clog, the top simply twists off and you look down and the drain is completely clean -- aways! A simple push and it seals and another push and it releases and allows the water to flow out. What a great invention. Why did it take so long to invent! What a joy!
R**E
Doesn't feel robust but thin metal
D**N
The product is good and work well except the lower seal. The seal seems too thin. It leaked. I kept the old seal and the leak stopped.
J**N
Easy to install and good quality
N**L
Well built but do not use the seals alone they leak . You have to use silicone with them .
A**H
I have had this sink pop-up drain for about two years, and the mechanism has completely stopped working. It is stuck in the open position, which is the only reason I can still use the sink. The problem appears to be the internal metal components — they have rusted, even though the product description clearly states that it will not rust. So the advertising claim is simply not true. It does rust, and the pop-up function fails because of it. I do not recommend buying this item.
Trustpilot
3 weeks ago
2 months ago


